Through the many music videos and adverts he has written and directed, Michel Gondry has developed and/or shown off practical techniques and effects. One of the most impressive examples is his music video for Radiohead's 'Knives Out'.
The entire video is a continuous take in which the camera slowly pans around 360˚ a number of times. As the camera spins, the set continuously changes - props are added, removed or changed each time we see them.
Technically, the video must have been incredibly difficult to pull off (if for no other reason than that it's a continuous take, meaning everyone involved had to 'get it right' at the same time), and obviously took a lot of planning, both in order to choreograph the cast and crew, and also to co-ordinate camera movement and lighting changes.
Throughout the video, the camera moves freely with a level of shake, suggesting that it's hand-held. At 2 minutes in, however, it lifts to a birds-eye-view, suggesting that a crane was used for at least part of the video, if not the entirety.
What was probably most difficult to get right out of all the visual elements in the video is the lighting - the set isn't filled with sources for practicals, and the 360˚ angle combined with crane shots must have made the task of lighting the set nearly impossible. At first, I would have thought everything was lit from above to make it easier, but the crane shot tells me that at least part of the light is carefully framed out of windows.
And to make lighting even more difficult, there are a number of quick lighting changes choreographed, that dim ambient light and introduce sources from underneath bed sheets, for example, before shifting back to the norm.
Saturday, 20 April 2013
Wednesday, 17 April 2013
Naked Framing
From person to person, framing can either be overlooked in favour of one of the many other important elements in cinematography, such as depth of field, lighting, colour, camera movement, exposure, etc., or it can be given too much attention to the detriment of the other elements.
Either way, framing is a very important consideration for the cinematographer - it can reveal or conceal things depending on what the desired effect is. Good framing can draw the viewer into the emotion of a scene; bad framing can draw away from the emotion and make a shot look cluttered and messy.
Mike Leigh's 'Naked' uses subtle humour to (somewhat) lighten up the film's gritty realism. One of the best examples of this is comes from the framing of the the screenshot below, in which the character Johnny tilts his head to produce a composition that turns a decorative wall clock into a halo.

Tuesday, 9 April 2013
Sensors and rolling shutter
In my last post, I posted a video which involved a lot of fast movement and panning. Naturally, motion blur is going to occur with a sequence like this. However, a problem common to DSLR cameras is rolling shutter.
Rolling shutter is when, as with a camera sensor like the CMOS used in my Canon 550D, a frame isn't recorded at an exact moment - that is, part of the frame is captured slightly before another part. This leads to objects becoming warped when applying camera movement such as panning, or when an object passes the camera very quickly.
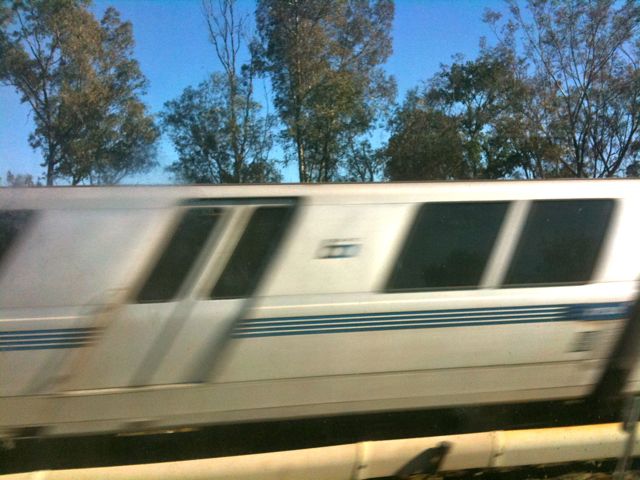
This leads to vertical objects appearing to 'lean' to one side on the recorded image.
Google images gives a good example of this in a photograph of a train:

This article explains why this occurs with most common consumer cameras. As the article states, CMOS sensors used in DSLR cameras typically use a rolling shutter rather than a global shutter, meaning that it "actually exposes different portions of the frame at different points in time, “rolling” through the frame" - although, this is due to the sensor "telling different portions to become light-sensitive at different moments in time", rather than a physically-rolling shutter system.
CMOS sensors using a rolling shutter system are said to be more energy-efficient, which probably explains their usage in consumer products. This makes sense, but also makes it difficult to 'pull-off' quick motion on a small budget without it becoming distorted like the picture above.
Rolling shutter is when, as with a camera sensor like the CMOS used in my Canon 550D, a frame isn't recorded at an exact moment - that is, part of the frame is captured slightly before another part. This leads to objects becoming warped when applying camera movement such as panning, or when an object passes the camera very quickly.
This leads to vertical objects appearing to 'lean' to one side on the recorded image.
Google images gives a good example of this in a photograph of a train:
This article explains why this occurs with most common consumer cameras. As the article states, CMOS sensors used in DSLR cameras typically use a rolling shutter rather than a global shutter, meaning that it "actually exposes different portions of the frame at different points in time, “rolling” through the frame" - although, this is due to the sensor "telling different portions to become light-sensitive at different moments in time", rather than a physically-rolling shutter system.
CMOS sensors using a rolling shutter system are said to be more energy-efficient, which probably explains their usage in consumer products. This makes sense, but also makes it difficult to 'pull-off' quick motion on a small budget without it becoming distorted like the picture above.
Experimenting in the garden
Using the same technique (using the tripod itself as a counter-weight) as mentioned in my last post, I experimented with this 'makeshift Steadicam'.
I tested it out at different heights to see how a Steadicam can give different effects when used at different people's eyelevels, but the most fun result I got was when I flipped the whole thing upside-down and tried to see how it would look for a guinea pig trying to escape from owners that forget to feed it.
I rotated the video back using Premiere Pro.
Running around with a DSLR highlights one of the biggest problems with this type of camera - because of the rolling shutter effect, the video looks much shakier and more blurred than it ordinarily would (although, to be fair to the DSLR, this was also filmed with a shutter speed of 1/50, which gives much more motion blur than it would if it were doubled to 1/100).
Cheap Steadicam
Because I've resigned myself to the fact that I'll never be able to afford a proper Steadicam, I've been looking around online for cheap alternatives.
A popular way of getting a similar effect to a Steadicam is to just use a tripod and try to counter-balance the weight of the camera at the top with the tripod itself at the bottom. This means the tripod has to be held at a certain point, and the balance can be adjusted by extending the tripod's legs more or less to account for different camera and lens weights.
This technique is explained more clearly in this video (which can't be embedded here, so I'm posting the link instead):
https://vimeo.com/36206229
And another video (which CAN be embedded):
During the shoot in Grindleford, Poppy brought along her tripod, which she'd attached a weight to to get a similar effect. There are plenty of tutorials on the internet that explain how to build Steadicam-like systems on a budget, and most recommend using a weight to act as the counter-weight (which seems totally illogical...). Poppy used the same technique as is explained in the below video, but just attached the weight to a tripod rather than putting together the rest of the 'Steadicam'.
Wednesday, 3 April 2013
Camera log - Grindleford shoot
I've compiled a camera log sheet for the two DSLR cameras used for the Grindleford shoot, which will hopefully be useful when it comes to editing the film.
Before the shoot, Poppy compiled this shot list taking different people's ideas into account:
 The shot numbers in the camera log below correspond to those on Poppy's shot list above, with the exception of shot 18, which Poppy added on the day.

Before the shoot, Poppy compiled this shot list taking different people's ideas into account:


Storyboard - Grindleford shoot
We agreed to each storyboard the scene individually, show each storyboard to the group and then take ideas from each person's vision for the film and put together a single storyboard.
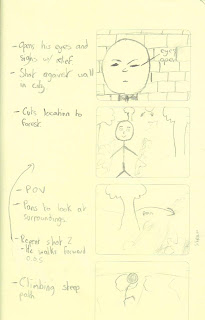
I took influence in the first shot from a sequence in the first half of Scott Pilgrim vs The World in which the character Scott is in a trance, and the editing cuts abruptly several times through time and place - in one shot Scott is playing bass at his band's practice, before his bandmate's head enters the shot shouting 'Scott!', and the camera cuts to a mid-shot of these characters in the same position only now they're walking down the street.
I used this idea in my storyboard - the final shot of the preceding scene will show the character scrunching up his face with a brick wall as the background - in my storyboard, the opening shot of the following scene will still be filmed against the brick wall, as he opens his eyes again, before cutting to the new location of the woods.
Here are scans of my storyboard for the woods scene:


Subscribe to:
Posts (Atom)